Wednesday 31 July 2013
Bleach dying - Pinterest Wednesday
I got the idea to do this after seeing this pin http://pinterest.com/pin/365706432212112802/
Although it's different, it gave me the idea for this. I thought that if I created a stencil and dabbed bleach through it that it might work, so I did a google search for a stencil to try out and printed it on thick photographic gloss paper. The reason I did that is that I thought the bleach may soak through the paper if it was plain paper or card.
I then cut it out using a craft knife:
I then positioned the stencil where I wanted the pattern to be, and then dabbed on toilet bleach (make sure it's bleach, not cleaner. I made that mistake to start with!) Also, make sure you put something underneath the area you're bleaching or it will go through to the other side. I used a folder wrapped in a bin bag, tucked inside the top. I also recommend wearing rubber gloves:
The dye will start to bleach before your very eyes. Once you are happy with it, wash it straight away in cold water to get rid of any excess bleach, and then pop it in the washing machine.
I LOVED the way it turned out! I'm going to make my own designs and use this technique to upcycle some old clothes. Coming soon to my Etsy shop! xxx
Wednesday 10 July 2013
Salt dough decorations - Pinterest Wednesday
For this weeks Pinterest Wednesday post, I decided to give salt dough a try. I've never done it before, but read that you just use a half, half, whole recipe. I used 1 cup of flour, 1/2 cup of salt and 1/2 cup of water.
I had a play about with it and don't think it's something that I would rush back into doing if I'm honest, but I think the weather didn't help! The dough just kept sticking as it was SO hot! I tried stamping some and then wanted to cut them out afterwards, but found that you get the best results by using cookie cutters.
Here are my favourite pieces:
I'm a complete beach bunny and live on the South Coast, so love anything with an nautical theme! I think salt dough would be great to use to make Christmas decorations, so I'll probably give it another go when the weather cools down.
To make these I rolled the dough out, cut the shapes out and then stamped them with some stamps that I bought. I then baked them in the oven on the lowest setting for about 4-5 hours. Once cooled, I sprayed them with polyurethane varnish. This means that they should keep for years and years (if looked after properly).
Here are some related pins that I found:
http://pinterest.com/pin/365706432211944277/
http://pinterest.com/pin/365706432211805331/
http://pinterest.com/pin/417216352949343379/
http://pinterest.com/pin/276197389619050572/
Wednesday 3 July 2013
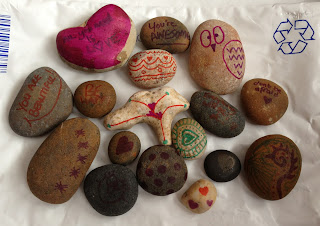
Decorated pebbles - Pinterest Wednesday
I've seen a few pins on Pinterest of decorated pebbles and decided to give them a go myself. Here are some pins I found if you want to check them out:
https://pinterest.com/pin/365706432212007367/
https://pinterest.com/pin/365706432212006075/
https://pinterest.com/pin/365706432211860305/
https://pinterest.com/pin/365706432211802486/
https://pinterest.com/pin/365706432211430733/
If you want to try this yourself, I suggest using fine markers. Unfortunately I only had regular Sharpies to hand.
So yes, they're no where near as good as the ones you see on Pinterest haha. I'm going to get myself some fine markers I think and write inspirational quotes on others at a later date and put them back on Southsea seafront. These are quite fun to do and I'm sure kids would love having a go =)
Subscribe to:
Posts (Atom)


