Wednesday 18 December 2013

Game of Thrones Snowflakes - Pinterest Wednesday

Yeah I know, it's another snowflakes post haha I just really love these, and I'm cheating too as I didn't see these on Pinterest (although mine will be on there in a second). It's Christmas though, so I'm bending the rules ;-p

I had planned on doing a Pinterest food post this week, but it's been SO hectic getting everything ready for Christmas and for college this weekend, so I thought I would share these instead =)

These Game of Thrones templates are by Krystal Higgins and can be downloaded from her website here:

http://www.kryshiggins.com/free-game-of-thrones-inspired-snowflake-patterns/

So here they are, I decided on Targaryen, Stark, Baratheon and Lannister :


I LOVE how they've turned out! I'm putting them up with my star wars ones from my previous blog post

As it is Christmas Day in a weeks time, there will be no Pinterest Wednesday as I will be stuffing my face with my beautiful Husband and seeing family and friends.

I hope you all have an absolutely magical Christmas and I'll see you in 2014 ♥

I'll leave you with a little bit of Michael Buble =)


xxxxxxxxxxx

Wednesday 11 December 2013

Print your own wrapping paper - Pinterest Wednesday

I got the idea to print my own wrapping paper after seeing this potato print pin:

http://www.pinterest.com/pin/365706432212756111/

I decided to give the potato print a try, and am really happy with the results, but I found the cutting of the potato quite fiddly, and the tree part and base ended up in 2 parts. This actually ended up working better though as I was able to print the tree and base without bleeding the paint together:


I then decided to try using a stencil, and decided to try using the star wars snowflakes I did a couple of weeks back (previous post here: http://www.emilyjoan.co.uk/2013/11/star-wars-snowflake-christmas.html )

and here are the results:


I love the storm trooper one! That has already been earmarked for one of my Father in laws presents and the Darth Vader one is pretty cool too, but looks better in the flesh.

I'm going to continue to try out more and more of these and will post the results in my 'homemade Christmas' post in the new year.

Is anyone else making anything as gifts, cards or wrapping? If so, I'd love to see it! Please feel free to message me a link on Twitter or Facebook, or leave a comment below =)

Here is a fantastic Christmas lights show to the sounds of the metal band, Machine Head =)


Wednesday 4 December 2013

Make your own Christmas cards - Pinterest Wednesday

I try to make my own Christmas cards each year, if I don't have the time then I buy some charity ones. This weeks pinterest post is more inspired by pinterest, rather than me copying a post.

Here are some fantastic ideas for making your own Christmas cards, starting with the one that inspired me to make the ones I have:

http://www.pinterest.com/pin/365706432212756152/
http://www.pinterest.com/pin/365706432212849004/
http://www.pinterest.com/pin/365706432212829408/
http://www.pinterest.com/pin/365706432212756084/
http://www.pinterest.com/pin/365706432212645061/
http://www.pinterest.com/pin/365706432212247264/

So to make mine, I used some A4 white card (folded in 2 to make A5), a glue stick, scissors, a compass and pencil, some different colour sharpies, some 'Merry Christmas' hearts that I had typed on my typewriter, some gorgeous tear out patterned paper from Craftseller magazine and a couple of pieces of awesome wrapping paper from gifts I've received that I thought was too beautiful to throw away.

Here are 4 cards that I have made already. I think they're awesome, so I hope the people receiving them think so too. I love the fox, owl and mushroom ones particularly. I just cut out the headshapes from the wrapping paper and glued them to the card. For the other baubles, I used the compass and pencil to draw the circles, cut them out and then stuck them to the card. I decided to do 4 per card as I didn't want to over clutter the cards. I then used a ruler to draw the lines with the sharpies and drew a little bow on the top of each bauble =)

I have left the inside of the cards blank to write a personal message.

I hope you like them and that this has given you some ideas to make your Christmas a little more 'homemade'. 

It's only 3 WEEKS TO GO!!!! I cannot wait!!! =D

Here's a little Shakin' Stevens to make you feel all Christmassy:


Wednesday 27 November 2013

Star Wars Snowflake Christmas decorations - Pinterest Wednesday

I'm sat here listening to Christmas songs and Christmas has taken over all the shops, there is no avoiding it, 4 weeks today will be Christmas Day! =D

For me, that means I need to start planning, in fact I feel a little behind already! I have bought a few pressies so far, but am no where near finished. I'm also starting to think about the food, etc. I'm making alot of Christmas presents this year. I won't be able to post them all as I know a few friends and family read this blog, so it'll spoil the surprise, but I will do a 'home-made Christmas' blog post after the festivities.

My first Christmas Pinterest post is Star Wars Snowflakes after seeing this pin: http://www.pinterest.com/pin/365706432212810368/

The guy that designed them is called Anthony Herrera and he is kind enough to allow us to download them for personal use for free. Check out all his designs here: http://www.anthonyherreradesigns.com/index.php/8-ahd-blog/8-star-wars-snowflakes-2013

I love the way they've turned out, although mine are far from perfect, they were great fun to make =)


and here is a little Run DMC to get you in the festive mood:


Wednesday 20 November 2013

Batteries - Pinterest Wednesday

I saw this pin: http://www.pinterest.com/pin/365706432212677393/ The one where you cut open an Energizer battery and find it is made up of watch batteries.

I've been meaning to see if this works for a while, but didn't have any Energizer batteries, so I tried it with a Duracell and a Sony battery.


The first one is the Sony and the second one was the Duracell (which was a bit leaky :-/). As you can see, neither of those brands are made up of the smaller batteries. They had both run out, so I didn't waste a battery. If I happen to come across an Energiser battery that has run out, I will open it up to see, but it did say on the pin that you must use that brand and model and that they couldn't guarantee any other brand, but I wanted to have a look to see anyway =)

Wednesday 13 November 2013

Make your own Sketch Books - Pinterest Wednesday

I saw this pin: http://www.pinterest.com/pin/365706432212740978/ for designing the covers of your sketch books, but I thought I would take it one step further, using some of the skills I learnt on a recent course and thought I would do a blog post on making your own sketch books.

Depending on what type of paper you want to use (for this example, I used regular copy paper, but for a sketch book, I'd use good cartridge paper. Saying that though, it's your sketch book, so you could use it to collect pictures, magazine cut outs, etc. Anything at all really, even fabric)

What you'll need is some paper, linen thread (for this I used 15 inches, but it will depend on the thickness of your paper and how many sheets you're putting together), a tapemeasure, and a book binding needle.


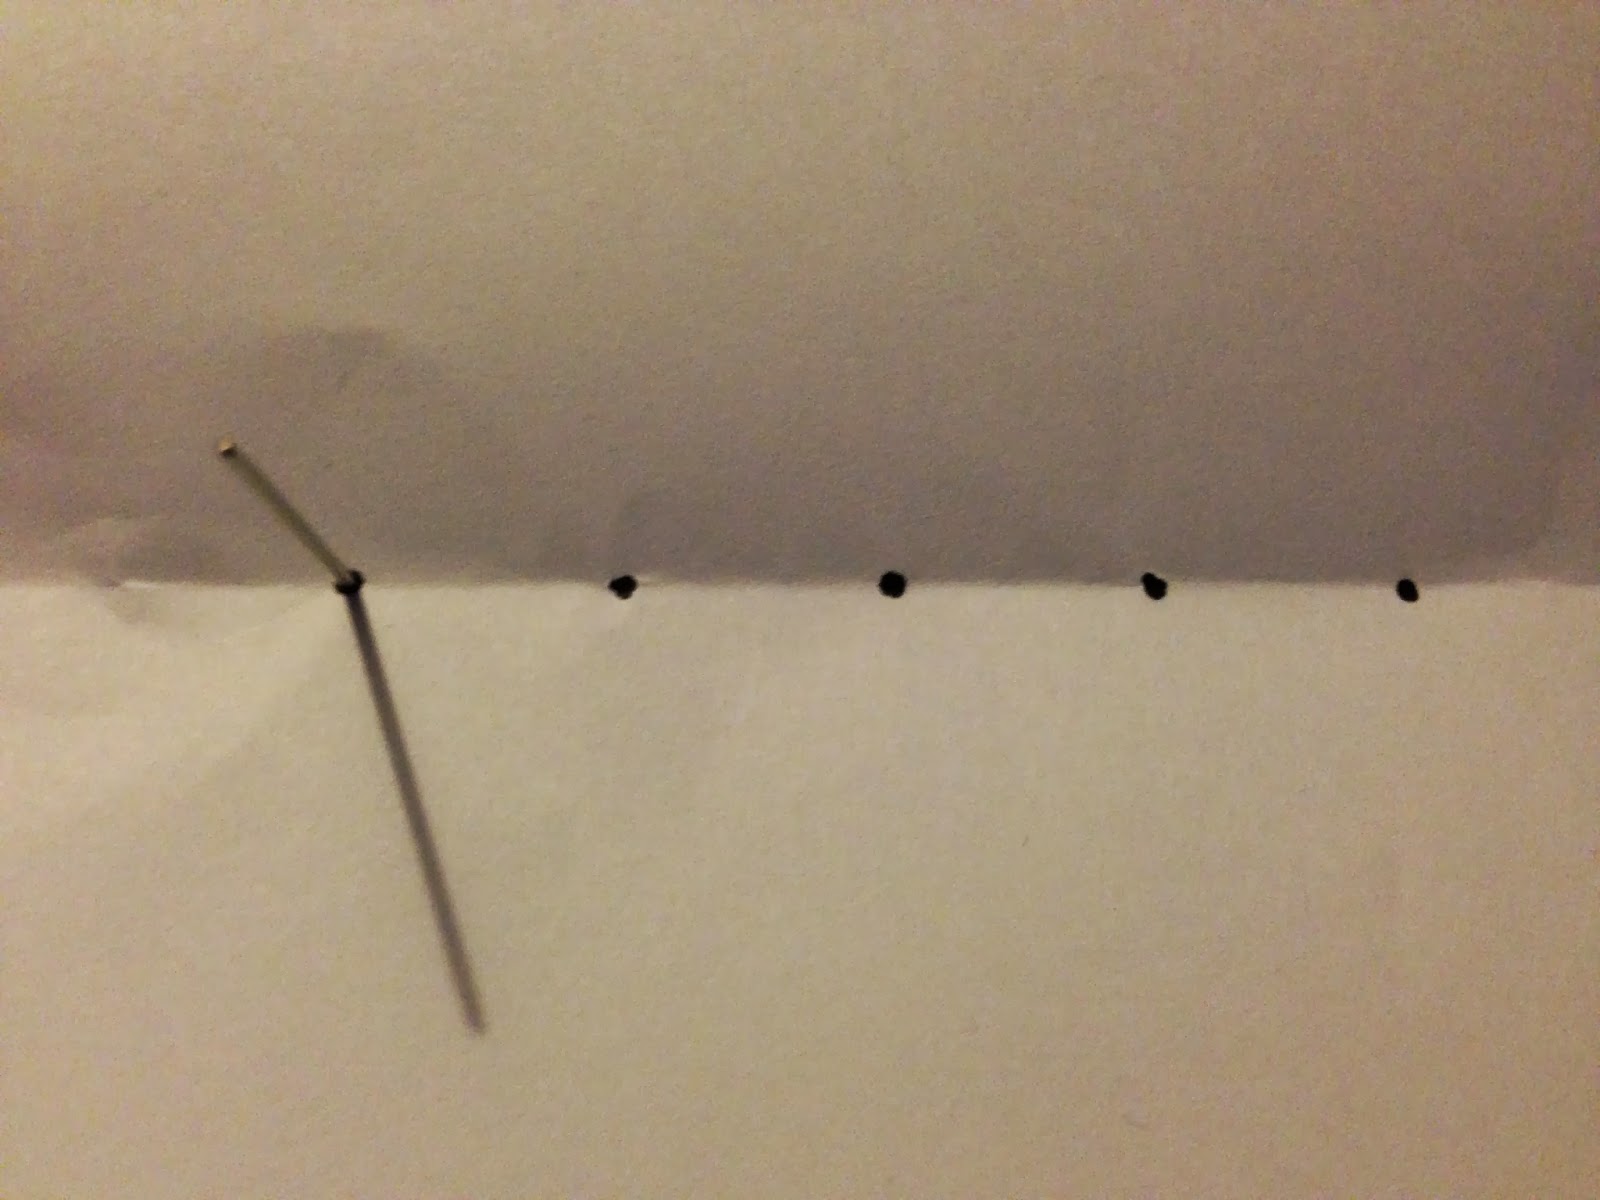
To start with, fold the paper in half. Along the fold find the centre point and then measure 2 dots to either side at 3/4 of an inch interval:

Then, using your book binding needle, pierce a hole through each dot:

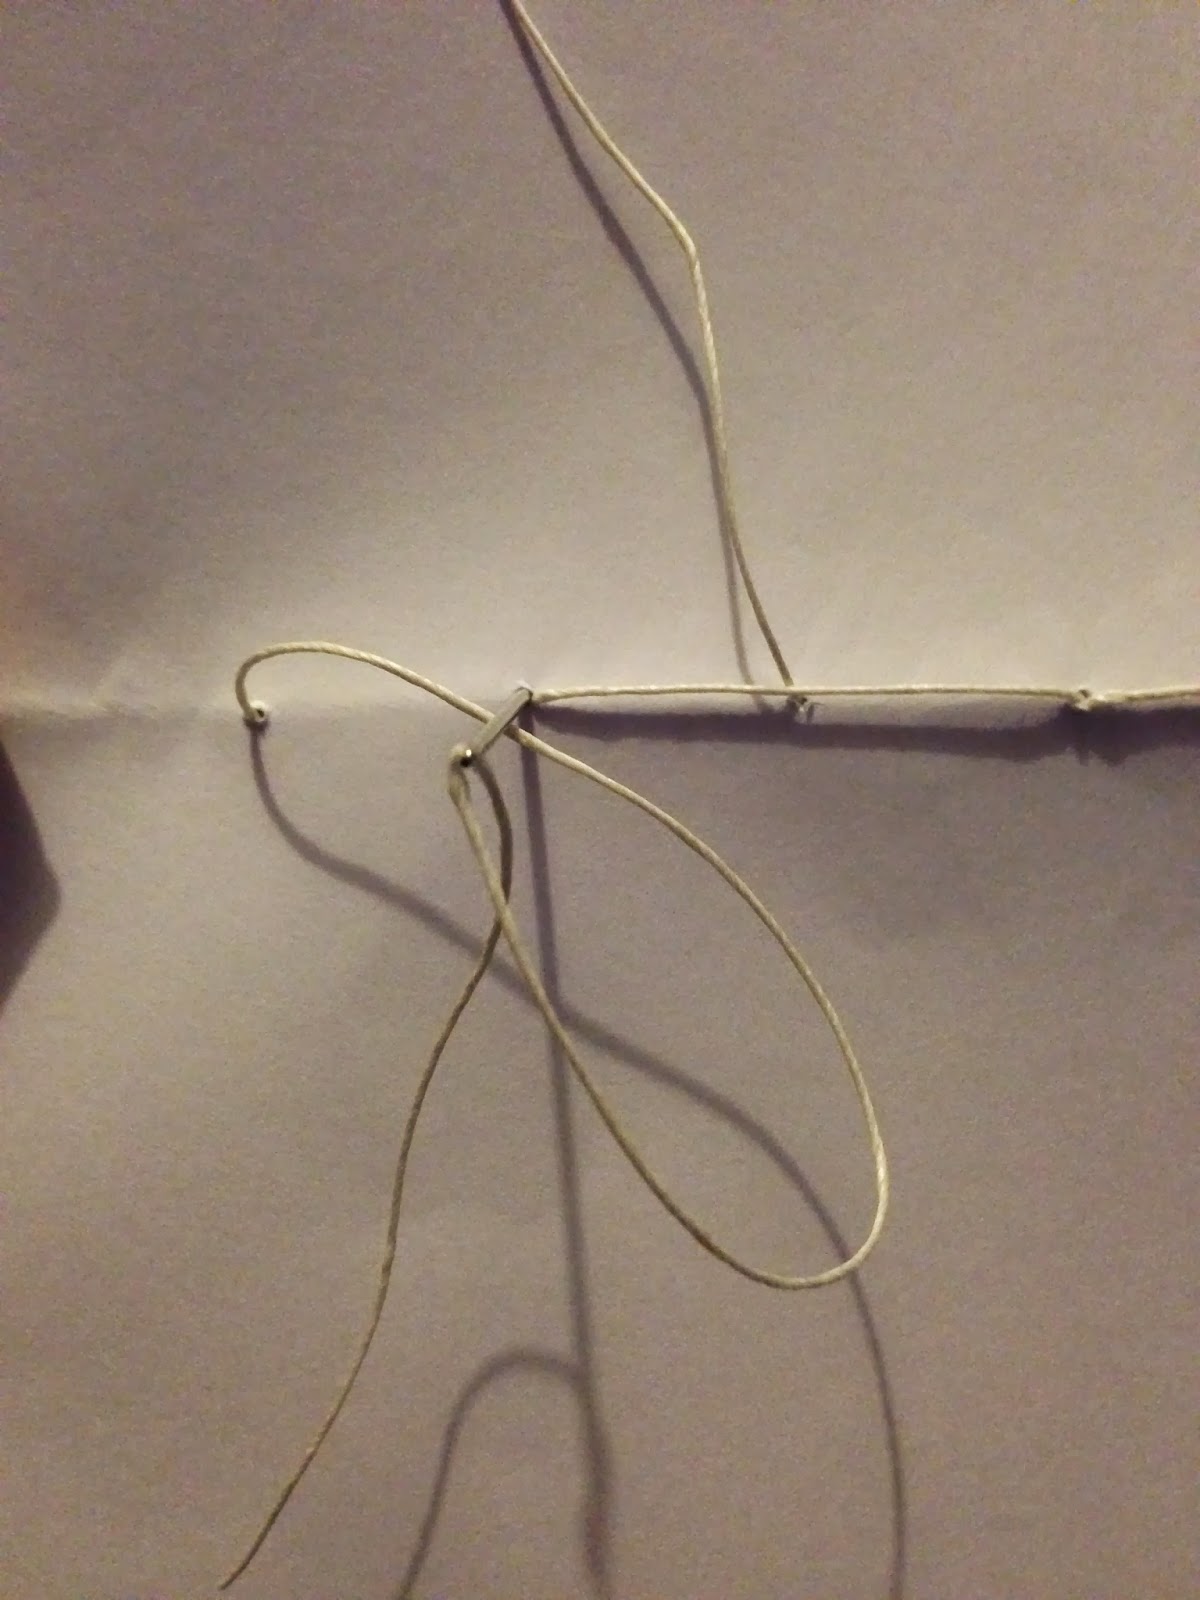
Thread the needle with your linen thread and start by going through the centre hole on the outside:

Then sew over to the next hole, bringing it through the other side:

 Then back up the next hole:

And so on:

 When you come back to the centre, you skip over it, and then go on to do the other side in the same way:


When you've sewn together the other side, you bring the thread up through the centre:

When you start to bring the thread up through the centre, bring it up on the other side of the thread, so that you can tie a knot around to secure the thread running through the middle:

Like so:

You can also bind many of these together to make a thicker, more secure book. This is the first one I made at college:

Then to decorate your sketch pad, draw a pattern that you like and decide which colours you'd like to use:

Voila!

In the New Year, I am planning to start doing some YouTube tutorial videos. I will do a video of this as I think it's a great little skill to have. I've found it really useful personally since I've started my Foundation Diploma in Art & Design as I can create sketchbooks with a theme.

I hope you find it useful. If you plan on making one also, please feel free to share a link to it, I'd love to see it =) x

Thursday 7 November 2013

Arty doodles - Pinterest Wednesday

Yes, on a Thursday again :-/ so sorry, I have been SO busy it's been ridiculous! I am going to try to be uber organised this week and make sure next weeks is written and ready on Wednesday!

While browsing through Pinterest this week, I came across this pin:
http://www.pinterest.com/pin/365706432212714149/

I really like this as I love to doodle. I've also been experimenting with pattern alot at college, so this sprang out at me to give a go!

Here is my attempt that I put together whilst sat in front of the TV:


Wednesday 23 October 2013

Hot dog mummies - Pinterest Wednesday

With Halloween fast approaching, I thought I would pick something Halloween themed to do this week. I also haven't done a food Pinterest post yet, so when I saw these I knew they'd be perfect to try out.

This is the pin that gave me the idea:
http://www.pinterest.com/pin/365706432212613771/

The hotdogs I used were Frys vegan hotdogs which I took out of the freezer to defrost. Whilst waiting for them to defrost I made some pastry (half the fat to flour with a dash of water to bind). When defrosted, I cut the hotdogs as shown in the picture and wrapped pieces of pastry around them. I love how they turned out!

 Just before going in the oven

With his leg bitten off with ketchup! Yum yum yum

Wednesday 16 October 2013

Decorated Door Knob - Pinterest Wednesday

I've been uber busy this week, so needed a quick Pinterest Wednesday post and decided on this: http://www.pinterest.com/pin/365706432212041203/

I'd seen the pin ages ago and had it saved, so I decided to draw it on today. I had wanted to copy it exactly, but the position of the screws in our door handle prevented me from doing so.

 
I could have done it neater haha, but I think it's quite cute =)

Thursday 10 October 2013

Penguin Toy - Pinterest Wednesday

Hi guys, sorry this post is a day late. I'm all mixed up with my days this week as I was in London on Monday and Winchester on Tuesday and it's kind of thrown me off for the week. I meant to get this all typed up last night but time ran away with me last night and I didn't get chance to in the end.

I was looking through Pinterest trying to decide what to do, and because I had made this toy at the weekend (for my Nephew's birthday) I decided to make another toy:


My Nephew has named this one, Doggy the Dragon haha bless him

I had this pin saved for a while and seeing as my Husband has recently started having a weird obsession with penguins O.o I decided to give it a go!

http://www.pinterest.com/pin/365706432212216639/

I have a collection of fabric, alot of which is upholstery fabric, and because this only called for small pieces, I decided to use some swatches that I had for a while. Well, that was a big mistake. Because it was a small toy, I couldn't give a large seam allowance, so my first attempt of the beak completely frayed appart. So I carried on trying to give as large a seam allowance as I could. It turned out ok, but I would definately use a lighter weight fabric in the future for projects of this size.


Please accept my apologies for the rubbish photo, it was late by the time I'd finished. Also, I see now from the photograph that I didn't fully turn around his right wing, so it looks a little off. He is a cutey though and I think I'm going to add more stitches and embroidery to him, to not only make him more secure because of the fabric I used, but to also give him a bit more character =)

He isn't my best work, but I love that he is a little quirky and off 

Wednesday 2 October 2013

Typing on top of photographs - Pinterest Wednesday

I came across this pin this week:

http://www.pinterest.com/pin/365706432212475132/

I love this idea! Especially for life events and fantastic holidays/days out. It is something I will be doing a lot of I'm sure.

I gave it a go with a photo that was taken of us on our wedding day (please excuse the bad quality of the picture, it has been stuck on our fridge for ages and faded. It has since been reprinted and replaced. Instead of throwing this one out, I decided to use it as my first try:


I then thought it would be nice to type some of my favourite lyrics onto a picture. Unfortunately all the beach photos I can find are of Southsea beach (pebbles) and the lyrics call for a sandy beach, so I took this one from google, I do not own it:


I think it looks great! I also think a trip to Devon is in order next summer to get some decent sandy beach pictures! That or the Maldives (a girl can dream.....)

Friday 27 September 2013

Vegetarian Mushroom Cheeseburger recipe

This is a super simple vegetarian mushroom cheeseburger that I adore, so thought I would share it.


To make this, I wiped my griddle pain with olive oil and put it on the heat. I then put the large portobello mushrooms on the pan to start cooking. I sliced open the bread rolls and then placed them on the griddle also to toast them. The key to this burger is toasting the bread as it gives another texture. Without doing so, it can be a bit too soft and mushy for me.

Once the mushroom was cooked and the bread toasted, I put them together, topped the mushroom with some feta cheese and chilli flakes =)

Really yummy!!

Wednesday 25 September 2013

Paper Star Decorations - Pinterest Wednesday

With Christmas right around the corner (yes, I know it's still September, but I witnessed John Lewis putting up their Christmas display today!) and with the many Christmas related pins appearing on Pinterest, I thought I would give making star decorations a go =)

This pin as fantastic step by step instructions:

http://www.pinterest.com/pin/365706432212477081/

I decided to use plain white paper for this as it was all I had to hand. For nearer Christmas I will source some prettier paper. A good idea might be to visit your local DIY chain and get a sample of a nice wallpaper that you like? I think I'll do that and create a star to hang in my studio when it's completed.

Here is my attempt with white paper. The paper is quite thin, so something a bit stronger would work better. I stuck mine together with double sided tape, which is fine for the two halves, but when sticking them together, I think using a glue gun as suggested would be a good idea.


Wednesday 18 September 2013

Family Doodles - Pinterest Wednesday

For this week, I decided to create our own 'Family Doodle' after seeing this pin:

http://www.pinterest.com/pin/365706432212028230/

I've seen these as car stickers as well as people having similar in their homes, so thought it would be great to give it a go =)

I sketched it out in pencil until I was happy, then went over it with a black marker pen.

Anyway, here is our family as a family doodle =) I've dated it so that I can create more in the future when our family changes


and here are some 'in progress' drawings:


Wednesday 4 September 2013

Fake Calligraphy - Pinterest Wednesday

Things have been so busy (I started college this weekend) that I decided to do a quicky Pinterest Wednesday post this week and chose 'fake calligraphy' after seeing this pin:

http://pinterest.com/pin/365706432212359031/

This is great to have a play about with, and fantastic to put a personal touch on making your own greetings cards, etc. You don't have to do the obvious thicker parts on the letters either! Have a play about and see what you like =)

Here are my attempts =)


I have now created a blog for my creative journey if you want to check it out: http://www.katemilleronline.com/

Thursday 22 August 2013

Jewellery Boxes - Pinterest Wednesday (on Thursday)

I have just booked my first craft fayre as Kate Miller Jewellery (Emily Joan fayres will be coming up soon too) so I decided it would be a great idea to try my hand at making some gift boxes. After seeing this pin http://pinterest.com/pin/365706432211698680/ I then googled 'jewellery box templates' and picked a few to try my hand with. I decided to use white paper for a practice as I'd like to get some nice fancy card for the actual boxes and didn't want to waste any incase I messed them up.

I then cut them out

and put them together (some will require glue)


As you can see in the picture, they don't all fit together quite right, so I'm glad I practiced on paper first. Some of the measurements seem to be off on some of the templates online, but they will give you a good basis to draw them up yourself properly, which is what I am going to do. I particularly like the top right version =)

Wednesday 14 August 2013

Re-using empty toilet rolls - Pinterest Wednesday

I've been keeping empty toilet rolls for a while thinking that I'd do something with them for a Pinterest Wednesday post.

This pin http://pinterest.com/pin/365706432212029724/ gives lots of fantastic ideas on how to re-use them, especially if you have children.

I decided to opt for using what I had to plant some seeds:

As you can see, I used 5 empty toilet rolls, a pack of cat grass seeds and a washed take-away container.

The pack of seeds I had have been in the back of a cupboard for a while, so I thought I'd throw a load in, just in case some dont grow, and to use them up.

I then just popped some more compost on them, watered them and now they're waiting to grow in our garden =)

Wednesday 7 August 2013

Paint Chip Bunting - Pinterest Wednesday

Hi guys, for this weeks post, I decided to try some paint chip bunting after seeing this pin http://pinterest.com/pin/365706432211316449/

All you need is some paint 'chip' cards from your local DIY store, a needle and thread, scissors (to cut the thread) and your choice of hole punch.


I had planned on doing a long anchor banner, but because the horizontal part of the anchor that I was going to put the thread through was so thin, it didn't work and I had to sew it vertically. I really like the way it turned out for the musical note and the cat though =) It would also work great with old newspaper or magazines =)